18 May 26

Greek Tile Nail Art

Have you ever seen those beautiful, classic Greek tiles? The blue and white patterns that instantly transport you to sunny Greece? How about wearing these stunning patterns on your nails? While the original nail art is quite intricate and requires a lot of precision work, we’ve created a simplified version that you can easily recreate yourself. Perfect for your next holiday!

In this blog, we’ll guide you step by step on how to achieve this nail art. The fun and easy part about this design is that the floral-like patterns can vary on each nail, so you don’t need to worry about symmetry. The different placements make the look even more fun!

Step 1: Prepare your nails

Step 1: Prepare your nails

We always say preparation is key! Prepare your nails according to the steps in our blog: ''The perfect Gel Polish prep routine in 4 steps''. Finish by applying your favourite Base Coat and let it cure for 60 seconds under the LED lamp.

Step 2: Apply a base colour

Step 2: Apply a base colour

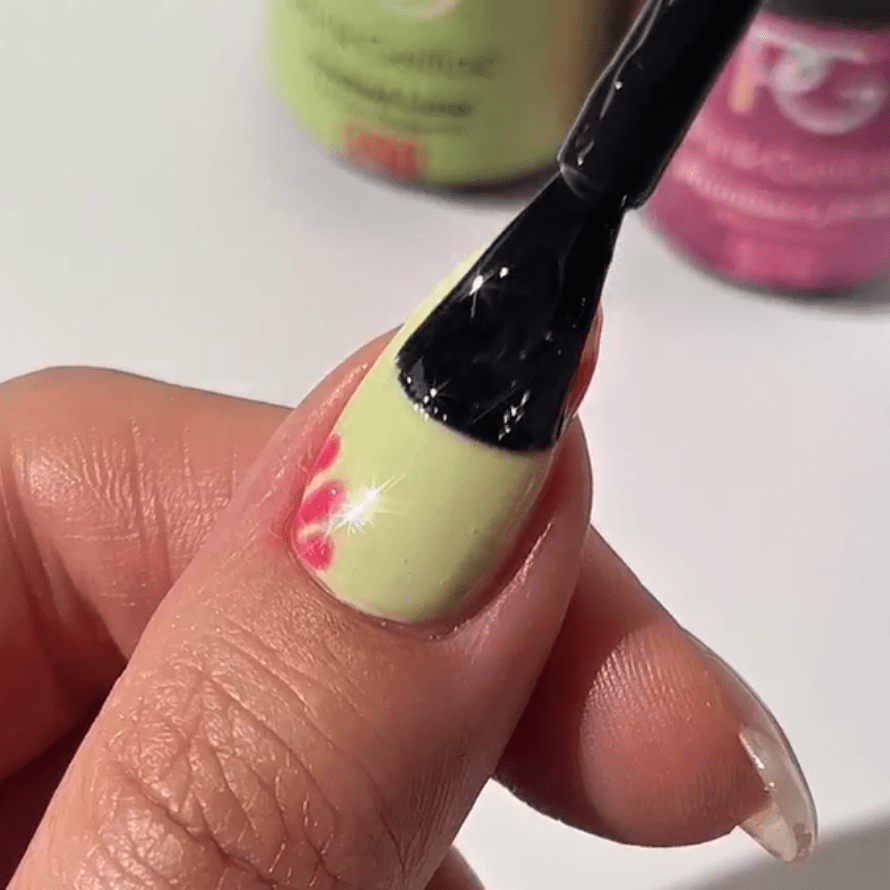
Now that your nails are perfectly prepped, it's time for the base layer! For this nail art look, apply 1 or 2 thin layers of 390 Chilled Lime, depending on the desired coverage, and cure each layer under the LED lamp for 60 seconds.

Step 3: Create the patels

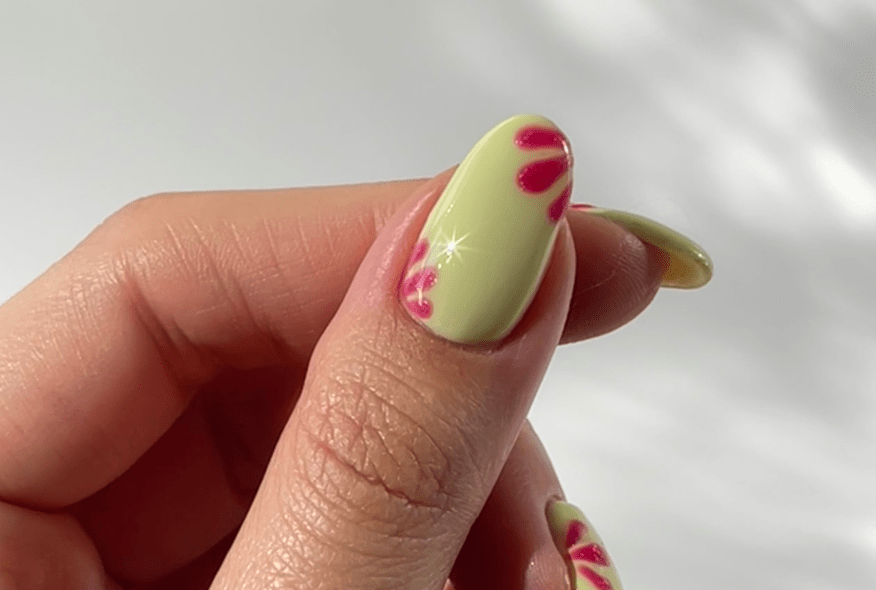
Your lucky number is 3. Use the Fine Liner to create three petals next to each other. With the Fineliner, draw a line using 376 Plumberry Pink, starting slightly thicker and tapering to a thin end to create the shape of a petal. To achieve this, apply a small dot of gel polish and pull it into a line towards the tip of the nail. Cure under the LED lamp for 60 seconds.

Step 4: Apply Top Coat

Step 4: Apply Top Coat

As the final step, apply a thin layer of your favourite Top Coat and let it cure for 60 seconds under the LED lamp. After curing, wait one minute, then wipe the nails with a Nail Wipe and Cleaner to remove the sticky layer.

As mentioned before, the pattern can be different on every nail, so have fun with it, place the design wherever you like and make this look completely your own! You can also experiment with any colour combination—just pick two contrasting shades and create the design using the Fine Liner.

Be inspired by the beautiful Greek tiles and create this summery look. Don’t forget to share your looks with us on social media, tag @pinkgellac and use #PinkGellac!

Heb je ooit die prachtige, klassieke Griekse tegels gezien? Die blauw-witte patronen die je meteen meenemen naar het zonnige Griekenland? Wat als je deze mooie designs op je nagels kon dragen? Originele nail art in deze stijl is vaak heel gedetailleerd en vergt veel precisie, maar wij hebben een vereenvoudigde versie gemaakt die je gemakkelijk zelf kunt creëren – perfect voor je volgende vakantie!

In deze blog laten we je stap voor stap zien hoe je dit nail art design maakt. Het leukste? De bloemachtige patronen kunnen op elke nagel anders zijn, dus je hoeft je geen zorgen te maken over symmetrie. De verschillende plaatsingen maken het juist extra speels!

"Close-up of a hand holding a pink foam block against a pink background."

Stap 1: Bereid je nagels voor

Wij zeggen altijd: een goede voorbereiding is de sleutel tot succes! Bereid je nagels voor volgens de stappen in onze blog ‘‘De perfecte gellak prep-routine in 4 stappen’’. Breng daarna je favoriete Base Coat aan en laat deze 60 seconden uitharden onder de LED-lamp.

A close-up of a hand using a brush to apply pale yellow nail polish to a nail.

Stap 2: Breng een basiskleur aan

Nu je nagels perfect voorbereid zijn, is het tijd voor de basiskleur! Voor dit nail art design breng je 1 of 2 dunne lagen van 390 Chilled Lime aan, afhankelijk van de gewenste dekking, en laat je elke laag 60 seconden uitharden onder de LED-lamp.

Stap 3: Maak de bloemblaadjes

Your lucky number is 3! Gebruik de Fine Liner om drie bloemblaadjes naast elkaar te tekenen. Trek met 376 Plumberry Pink een lijn die aan het begin iets dikker is en uitloopt in een dunne punt om de vorm van een bloemblaadje te creëren. Doe dit door een klein druppeltje gellak aan te brengen en het in een lijn naar de nagelrand te trekken. Laat het design 60 seconden uitharden onder de LED-lamp.

A hand showing a nail with a light green polish and a pink floral design, while a brush goes over it for a smooth finish. In the background are some colored nail polish bottles.

Stap 4: Breng de Top Coat aan

Als laatste stap breng je een dunne laag van je favoriete Top Coat aan en laat je deze 60 seconden uitharden onder de LED-lamp. Wacht na het uitharden één minuut en veeg je nagels daarna schoon met een Nail Wipe en Cleaner om de plakkerige laag te verwijderen.

A hand with light green nail polish and pink floral design, next to some bottles of nail polish and a pink nail dryer with the text "Pink Gellac".

Zoals eerder benoemd, kan het patroon op elke nagel anders zijn – dus leef je uit! Plaats het design waar jij het mooi vindt en maak de look helemaal eigen. Je kunt ook experimenteren met verschillende kleurcombinaties. Kies twee contrasterende tinten en creëer het design met de Fine Liner.

Laat je inspireren door de prachtige Griekse tegels en maak deze zomerse look. Vergeet niet je creaties met ons te delen op social media, tag @pinkgellac en gebruik #PinkGellac!

Ontdek Greek Tile nail art